If you've ever wanted to integrate live streaming into your Flutter app ZEGOCLOUD makes it ridiculously easy.
⚡ And the best part? It only takes a few lines of code — no backend setup required!✨ Why ZEGOCLOUD?
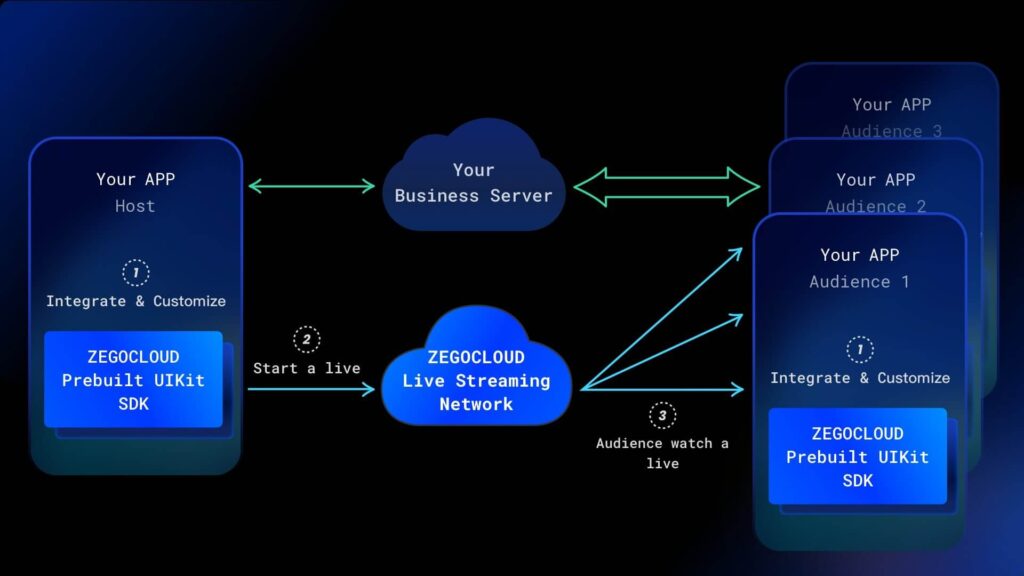
ZEGOCLOUD makes integrating live streaming incredibly simple:
1. No need to handle WebRTC protocols manually
2. Ready-to-use widgets for hosting and joining streams
3. Works across platforms
All we need is a unique userName to either go live or join an existing livestream using that user’s ID.
Get 10,000 free minutes to build and test your live streaming features with UIKits:
👉 https://bit.ly/4jW5qbk
🚀 Dive into more powerful features and services by exploring ZEGOCLOUD:
👉 https://bit.ly/3G29OYj
🔗 Step 1: Add Dependency
In your pubspec.yaml:
dependencies:
  flutter:
    sdk: flutter
  zego_uikit_prebuilt_live_streaming: ^3.14.1 # check for latest version
Then run:
flutter pub get👾 Step 2: Android Setup
✏️ Update SDK Version
Open android/app/build.gradle and set:
compileSdkVersion 35⚖️ Add Permissions
In android/app/src/main/AndroidManifest.xml, add:
<uses-permission android:name="android.permission.ACCESS_WIFI_STATE" />
<uses-permission android:name="android.permission.RECORD_AUDIO" />
<uses-permission android:name="android.permission.INTERNET" />
<uses-permission android:name="android.permission.ACCESS_NETWORK_STATE" />
<uses-permission android:name="android.permission.CAMERA" />
<uses-permission android:name="android.permission.BLUETOOTH" />
<uses-permission android:name="android.permission.MODIFY_AUDIO_SETTINGS" />
<uses-permission android:name="android.permission.WRITE_EXTERNAL_STORAGE" />
<uses-permission android:name="android.permission.READ_PHONE_STATE" />
<uses-permission android:name="android.permission.WAKE_LOCK" />
⛓ Prevent Code Obfuscation
Create android/app/proguard-rules.pro:
-keep class **.zego.** { *; }Then reference it inside android/app/build.gradle:
    buildTypes {
     getByName("release") {
        // Enables code shrinking
        isMinifyEnabled = true

        // Proguard rules
        proguardFiles(
            getDefaultProguardFile("proguard-android-optimize.txt"),
            "proguard-rules.pro"
        )

        signingConfig = signingConfigs.getByName("debug") // Optional
    }
    }
🌟 Step 3: iOS Setup
📁 Update Podfile
In ios/Podfile, update post_install block:
# Start of the permission_handler configuration
target.build_configurations.each do |config|
  config.build_settings['GCC_PREPROCESSOR_DEFINITIONS'] ||= [
    '$(inherited)',
    'PERMISSION_CAMERA=1',
    'PERMISSION_MICROPHONE=1',
  ]
end
# End of the permission_handler configuration
📝 Update Info.plist
In ios/Runner/Info.plist:
<key>NSCameraUsageDescription</key>
<string>We require camera access to connect to a live</string>
<key>NSMicrophoneUsageDescription</key>
<string>We require microphone access to connect to a live</string>
🛁 Sample Project Structure
lib/
├── constant/
│   └── const.dart
├── models/
│   └── live_user_model.dart
├── pages/
│   ├── home_page.dart
│   ├── onboarding_page.dart
│   └── user_card.dart
└── main.dart
lib/
├── constant/
│ └── const.dart
├── models/
│ └── live_user_model.dart
├── pages/
│ ├── home_page.dart
│ ├── onboarding_page.dart
│ └── user_card.dart
└── main.dart🏠 const.dart
const int yourAppID = 1545172332;
const String yourAppSign = '6ce3ebf30711eda9f7e70fc678e9a762e84dc73dfb5b5af8ab2f82add6ed830e';
const int yourAppID = 1545172332;
const String yourAppSign = '6ce3ebf30711eda9f7e70fc678e9a762e84dc73dfb5b5af8ab2f82add6ed830e';👤 live_user_model.dart
class LiveUser {
  final String userName;
  final String profileUrl;
  final String liveID;

  LiveUser({
    required this.userName,
    required this.profileUrl,
    required this.liveID,
  });
}
class LiveUser {
final String userName;
final String profileUrl;
final String liveID;
LiveUser({
required this.userName,
required this.profileUrl,
required this.liveID,
});
}🎥 main.dart
import 'package:flutter/material.dart';
import 'pages/onboarding_page.dart';

void main() => runApp(const LiveStreamApp());

class LiveStreamApp extends StatelessWidget {
  const LiveStreamApp({super.key});

  @override
  Widget build(BuildContext context) {
    return MaterialApp(
      title: 'Live Stream App',
      debugShowCheckedModeBanner: false,
      theme: ThemeData(useMaterial3: true, colorSchemeSeed: Colors.red),
      home: const OnboardingPage(),
    );
  }
}
import 'package:flutter/material.dart';
import 'pages/onboarding_page.dart';
void main() => runApp(const LiveStreamApp());
class LiveStreamApp extends StatelessWidget {
const LiveStreamApp({super.key});
@override
Widget build(BuildContext context) {
return MaterialApp(
title: 'Live Stream App',
debugShowCheckedModeBanner: false,
theme: ThemeData(useMaterial3: true, colorSchemeSeed: Colors.red),
home: const OnboardingPage(),
);
}
}We’ve already covered dependency installation, Android & iOS permissions, and ProGuard config.
Now, let’s dive into the actual live experience logic.
🎥 Going Live Button
When users press the "Go Live" button, we use their username as the live ID. This way, anyone who knows their name can join.
Here's how it works:
That's it. You’re now live 🎉
🔍 Join a Stream via Search
🧠 How It Works
The host uses their username as liveID when going live.
The audience enters that same username to join.
If the liveID matches an active stream, ZEGOCLOUD connects them seamlessly.
The host uses their username as liveID when going live.
The audience enters that same username to join.
If the liveID matches an active stream, ZEGOCLOUD connects them seamlessly.
🧩 Here's the Flow in Code
When the search icon is tapped, it shows a dialog:
💡 Design Note
We use an AlertDialog for the input field, which keeps the interaction native and non-intrusive. You could also replace this with a bottom sheet or dedicated page if you want more customization.
🎨 Onboarding & Homepage – Make It Yours!
To keep things simple and focused, we built a minimal onboarding screen where users can enter their username. This username is then used as their identity for both going live and joining streams.
The HomePage features a stylish layout with dummy user cards to give the app a polished, production-ready feel — but they’re purely for showcase purposes and don't impact the actual live streaming logic.
🎯 Feel free to customize everything — the design, layout, transitions, even add user avatars, settings, or real-time stream discovery!
This project was built to demonstrate how quickly and beautifully you can integrate live streaming into your Flutter app using ZEGOCLOUD — with just a few lines of code and no backend at all.